The cabinet's supporting structure is the face frame. These support the cabinet's door and drawer openings and can be made from wood or metal. Glue and clamps are the easiest method of assembly. A strong glue joint is created to hold the two pieces together. Mechanical fasteners can be used instead of clamps, but you must fill the screw or nail holes before installing the face frames. Here are some helpful tips for assembling your face frames.
Face frames are strong for the front of a cabinet
A face frame can be added to cabinets to make them appear more professional. You can use them to line up cabinets in rooms that aren't perfectly square. When you cut out your face frames, make sure they are at least 1/2" smaller than the desired cabinet dimensions. Gapping can be used to square up cabinets. Once you have established the dimensions of the pieces for your face frame, order them. Then cut them on the tablesaw. While you're cutting the pieces, be sure to make accurate cuts so they look good. Once the pieces are cut and assembled, attach the bottom shelf with 1-1/4" pocket hole screws.
They can be used to create door and drawer openings
Face frames create openings in cabinets, drawers, and doors. They are typically made of wood or metal and can be screwed or glued into place. It is easiest to attach the frames using glue and clamps. A strong, permanent attachment can be achieved by gluing the joints tightly. If clamps are too difficult, mechanical fasteners can be used. Fill in all nail and screw holes.
They can also be made from metal or wood
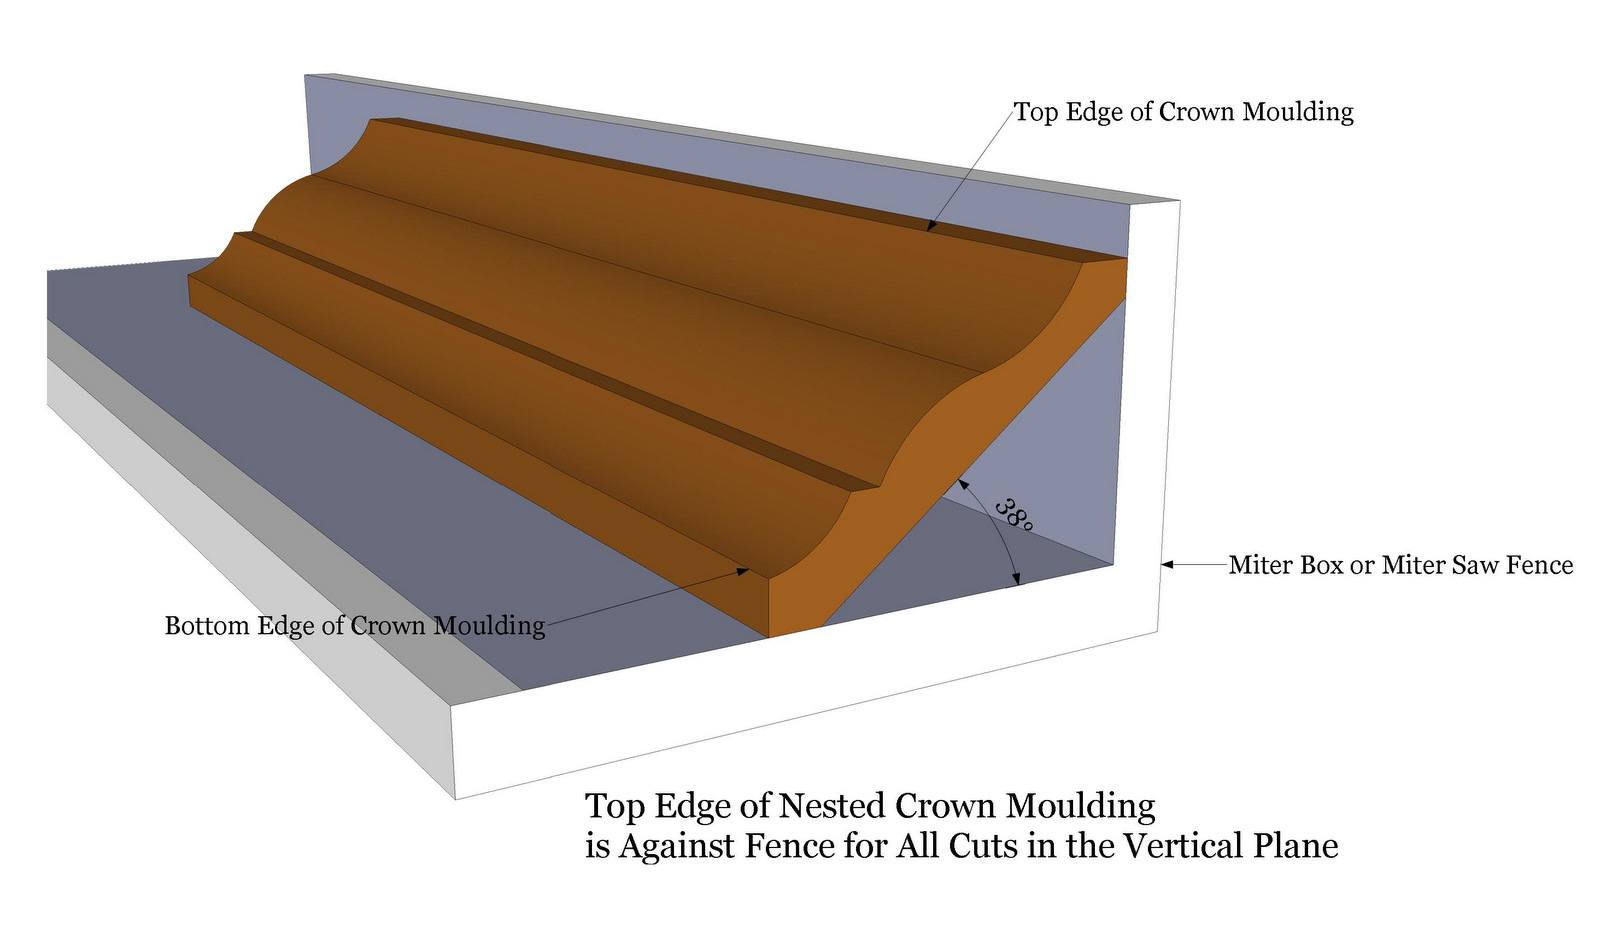
A faceframe is a frame that is constructed with both vertical and horizontal parts. It is placed on the front side of the case. It consists of rails as well as inner and outer stiles. The frame can be attached to the carcass with wood glue or wooden brads. For securing the frame while it dries, wood glue is recommended. Wood brads may be used where there is no place to attach the frame. If you want them to be invisible, it is a good idea to use wood putty.
They can come in many widths
The face frame is a key element in a cabinet's aesthetics. You can make a frame in any width you like, from 3/4" to 2". Face frames are made of 1 inch thick wood. They are often attached using a pocket screws joint. You also have the option of making your frame square or beaded. The size and number of openings are also customizable. A Customer Service Specialist can help you make the right decision about the different options for your cabinet.

These can be attached using PVA glue or pocket hole joinery to a bag.
Face frames can be attached to cases using either Kreg's pockethole joinery or PVA glue. The frame can be secured to the case using either 3/8" dowels, or plugs. For best results, use wood with contrasting species and avoid painting the frame before installing the face frames. Melamine-coated particleboard is an alternative that's more durable.
FAQ
Where can I purchase woodworking supplies
There are plenty of places where you can find everything you need to start out. You can visit your local hardware stores, or you can look online at sites like Amazon.com.
You might also consider flea markets and garage sale for any old furniture or other materials you could reuse.
Is it possible to learn woodworking by yourself?
Learning by doing is the best way of learning anything. Woodworking is an intricate art form that requires practice, skill, patience, and experience. Every craft takes practice and patience.
The best way to learn how to do something is actually to do it. Start small and use what you learn.
What is the difference in a hobbyist and professional woodworker?
Hobbyists enjoy making things out of wood, whereas professionals focus more on the quality of their work. Hobbyists take great pride in their creations, and share them with family and friends. Professionals spend hours researching design ideas before starting to work on a project. They will pay attention to every detail, from selecting the best materials to finishing the project perfectly.
Statistics
- Most woodworkers agree that lumber moisture needs to be under 10% for building furniture. (woodandshop.com)
- If your lumber isn't as dry as you would like when you purchase it (over 22% in Glen Huey's opinion…probably over 10-15% in my opinion), then it's a good idea to let it acclimate to your workshop for a couple of weeks. (woodandshop.com)
- The best-paid 10 percent make $76,000, while the lowest-paid 10 percent make $34,000. (zippia.com)
- Woodworkers on the lower end of that spectrum, the bottom 10% to be exact, make roughly $24,000 a year, while the top 10% makes $108,000. (zippia.com)
External Links
How To
How to drive a nail through wood
First, choose the right size and type of tool to drive a nail through wood. Claw hammers include mallets, claw hammers (sledgehammers), mallets, ball-peen hammers, hatchets, and mallets. Each kind of hammer has its own advantages and disadvantages. A clawhammer works best when hitting something hard like nails. However, it can sometimes be difficult to see exactly where the strike is going. A sledgehammer is great for hitting large areas at once, but it's too heavy to use effectively for smaller tasks.
After choosing the right hammer, place your hand flat against the side of the head so that the handle rests comfortably in your palm. You can grip the handle with your fingers, but not so tight that it causes injury. Hold the hammer straight up, keeping your wrist relaxed. Then swing the hammer back toward the ground, aiming for the center of the nail. You should feel the impact of the hammer striking the nail. Try practicing with a block to help you master the art of swinging a stick.
The hammer should be held close to your body when you are ready to begin driving the nail. Place the nail so that it is perpendicular with the wood's surface. Your eyes should be focused on the nail's tip. Swing the hammer forward, and then move the hammerhead. This can be repeated several times to increase the speed of your swing. Once you've mastered the technique, try adding power to your swings. To make it more powerful, hold the hammer up high to your shoulder and then bring it down. You'll have more energy to work with.
Once you have made the first hole, remove your hammer. To remove the remainder of the nails, you can use a screwdriver/pry bar. Keep the nail heads parallel to the board's surfaces in order to avoid splitting wood.