You have come to the right place if your goal is to create wood-carved caricatures. You'll find information about safety and design. You can transform a standard caricature into a masterpiece. If you're unsure how to start, read on for some tips to make your caricature as unique as possible. There are also classes offered by caricaturists.
Techniques
Wood carving caricatures are a unique form of sculpture. These caricatures are funny and tell a story with no words. Caricature depicts a cartoonized version of a real person. Dave Stetson is one of the best wood carvers. He adheres to a strict code for realism. There are certain rules you should follow to create an effective caricature. This article will cover the basics of caricature-carving and give tips for creating one.
First, the technique to carve an astronaut requires focus. To carve an astronaut, you will need to use whittling knives or spoon carving knives. These are delicate tools. You can also use templates to help you make your work easier while carving the astronaut. Finally, a good tutorial will provide step-by-step instructions on how to finish your caricature. A tutorial on this subject might be worth your consideration if you are tight on budget.
Designs
You can create wood-carved caricatures in many different ways. Using a pattern is a great way to start. You can also buy a cardboard cutter and use the same patterns to carve different types. A tutorial on caricature carving can be followed. This article will help you learn about the best techniques and designs for carving a caricature.
Fred's first caricature was titled "Aristocrats of the Roads". It depicted two men wandering. It was made out of Honduras Mahogany. Fred entered the piece in competitions and received several awards. He also featured it in the Chipping Away Catalog. Fred created a second Luciano Pavarotti caricature in 2009. He won a Second Runner up Award at a national woodcarving convention.
Eyes
The first thing to remember when carving caricatures of people is to make sure the eyes look realistic. There is nothing wrong in having realistic looking eyes. However, viewers may not be satisfied with a caricature lacking the right amount detail. To make sure that your eyes are symmetrical, you can take a photograph of an existing carving and follow the steps outlined in the photo.
Next, you need to decide the shape of your eyes. Some carvers work with the same shape of eyes as others. Others create more convincing eyes using different shapes. Stop cuts can be used to make your eyes symmetrical. Lastly, you will need to carve the pupil and the iris. After you have completed these details, you can move on to carving the caricature.
Safety
The wood carving caricatures are very unique. They are capable of telling a story without using words. Their creators take great care to ensure that their work is accurate. Caricatures often depict people or things in exaggerated ways to convey an impression. Dave Stetson, a wood carving carver, has set strict guidelines for safety and quality. He also provides information to consumers.
Before carving a caricature, first, clean the wood and remove any pencil marks. You can clean the surface with water or dish soap. To carve the neck and head, use a V-shaped 60 degree tool. The 60-degree V-shaped tool is a good choice for carving, as it can easily cut wood. Ramelson 60° V-shaped Carving tool is a great choice. It's sharp and simple to operate.
Materials
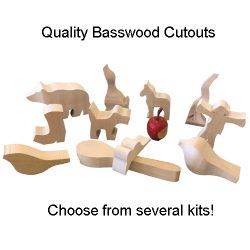
If you are looking for a fun and challenging way to carve animals, you can learn how to create caricatures of animals with materials like wood and wire. Although animal caricatures don't have the same level of detail as human ones, they are still very entertaining and can tell stories without using words. Caricatures have a heightened sense of reality. Carving caricatures can be a challenging hobby for some beginners, but for the more experienced carver, there are a number of materials to consider.
A wood board and chisels are the two main materials that you need for carving. A hammer and chisels are also required. Acrylic white paint can be used as the base layer. It is available at craft stores. Once the base layer is complete, you can begin the second layer. This layer will include a golden brown color and a few drops (Academy) of burnt-sienna. Use 2 drops of sunkissed pearl for the face.
FAQ
How often should new supplies be purchased?
You'll probably have to replace some of your tools over time. Sharpening hand tools is a must. For power tools, replacement parts will be required frequently. Try spreading your purchases over a few months so you don't buy too many at once.
Is it hard to start my own woodworking business?
It is difficult to start your own woodworking company. There are many laws and regulations you need to be aware of. But, this doesn't mean you need to go through all of the trouble of setting up your business. Many people decide to join established businesses. This allows you to join existing businesses and pay only membership fees.
What else should I know about woodworking in general?
It's easy to underestimate the amount of work involved in making furniture. The hardest part of the process is actually finding the right wood. There are so many options for wood, it can be difficult choosing the right one.
A problem is that wood doesn't have the same properties. Wooden can split or crack, while some woods may warp. These are important considerations to make before you purchase wood.
Is it necessary to be a genius in woodworking to succeed?
No. It is not rocket science to woodwork. Anyone can learn how to use basic power tools and techniques to create beautiful works of art.
Do you have the skills to learn woodworking?
It is best to do it yourself. Woodworking requires patience, practice and skill. To master any craft, it takes time.
Learning how to do something is best done by doing it. Start small and learn from your mistakes.
How much should a hobbyist invest to get started?
You will need capital to purchase the tools and supplies you need to start your woodworking business. You can start by purchasing a small table saw and drill press as well as a circular saw, circular saw, jigsaw and sanding machines. These items are affordable so you won’t break the bank.
Statistics
- In 2014, there were just over 237,000 jobs for all woodworkers, with other wood product manufacturing employing 23 percent; wood kitchen cabinets and countertop manufacturing employing 21 percent. (theartcareerproject.com)
- If your lumber isn't as dry as you would like when you purchase it (over 22% in Glen Huey's opinion…probably over 10-15% in my opinion), then it's a good idea to let it acclimate to your workshop for a couple of weeks. (woodandshop.com)
- The best-paid 10 percent make $76,000, while the lowest-paid 10 percent make $34,000. (zippia.com)
- Woodworkers on the lower end of that spectrum, the bottom 10% to be exact, make roughly $24,000 a year, while the top 10% makes $108,000. (zippia.com)
External Links
How To
How to stain wood
Staining wood refers to applying chemicals to wood's surface. This chemical reaction causes the wood to change in color. This chemical reaction causes the wood to change from white to brownish red. The most common type of wood used for staining is oak, although many other types of wood can be stained.
There are several ways to apply stains to wood surfaces. You can mix the stain with a solvent, such as turpentine, and spray it onto the wood. Other methods use a solution of water and dye applied directly to the wood. It is possible to mix stain into varnishes and paints, making it part of the finishing coat.
Preparing the surface for staining wood is the first step. Clean the wood to get rid of any grease, dirt or other substances that might be detrimental to the stain's application. Sanding the wood removes scratches and imperfections. You must then decide on the type of stain that you wish to use. There are two main types of stain: non-penetrating and penetrating. Penetrating stains penetrate deeper than non-penetrating stains, which makes them great for dark colors like mahogany. Penetrating stains are best paired with lighter colors, such as maple.
After deciding on the type of stain, you want to apply, prepare your tools. Because you can spread the stain evenly with a paintbrush, it is ideal for applying them. A few rags are also handy to clean up any spillages after you have finished painting. You should have enough containers to store the various components of the stain mixture if you intend to mix it yourself.
Once you have prepared your materials, start by cleaning the area where you plan to stain the wood. Use warm water and soap to clean away dirt and dust. Wipe down all furniture pieces with a dampened cloth and clean water. You should remove any debris, especially if your plan is to stain darker wood.
Apply the stain next. Next, apply the stain to the furniture by starting at one end. Work slowly and carefully, moving back and forth along the grain of the wood until you reach the opposite end. Keep the stain from dripping off the wood's surface. Before proceeding to the next step, let the stain dry thoroughly.
To protect the painted surface, apply a coat of clear polyurethane sealant. Three coats are recommended for polyurethane. Allow the third coat to dry overnight, before sanding.