
You can add color to wood carvings by using watercolor paint. The paint can be sunk into the wood to show the grain. There are two options for watercolor paint: cakes or tubes. The cakes are thicker so they are less likely to drip. Remember that water-based colors can be affected if they are in contact with dust or wood shavings. You can apply a thin layer primer to your painting if you have lots of time.
Oil-based paints
Oil-based oil paints can be used for painting wood carvings. Certain woods are better suited to oil-based paints like maple and birch wood. However, if you are painting a kitchen utensil, you may want to avoid oil-based paints. There are other benefits to oil-based wood carving paints.
Watercolors
Watercolour painting wood with watercolour paints is a great way to express yourself creatively while keeping the wood's integrity. Watercolors do not tend to warp. Watercolors do require some preparation. Sandpaper is an effective tool. However, for the center section in your wood carving, you will need to use fine grit. By doing this, watercolor pigments will shine through the wood and appear framed. For safety, you should wear protective eyewear and a dust-removal kit.
Gesso
Before you can begin painting your wood carvings, you must first prepare the piece. You can use either the artist grade or student grade gesso. The student grade is generally white, while the artist grade is darker. Acrylic paint is another option for more pigmented painting. To create the desired color, you will need a combination of gesso and paint. After drying, apply several thin coats paint.
Acrylic paints
If you're interested in creating beautiful pieces of art from wood, acrylic paints are a great choice for woodcarving projects. Acrylic paints stick to various types of wood and are non-toxic. Plus, they're non-toxic. They are ACMI certified, making it ideal for people with sensitive skin. These are some tips to help you choose acrylic paints to paint woodcarvings.
Oil-based paints mixed together with gesso
Gesso is made from whiting and animal glues. You can find it in white or colored versions. The consistency of gesso will depend on the type you buy. Some brands will apply quickly, while some will leave a toothy look. You can experiment with many brands to find the one that suits you best. Liquitex Super Heavy Gesso would be a great choice to add sculptural effects to a canvas. Apply it with a palette knife.
Basswood panel
Prior to applying paint to your basswood panel, seal it first. Wood's natural oils can cause wood paint to crack over time. Sealers make the wood surface smooth and uniform, preventing paint from penetrating the wood pores. If the wood is properly sealed, it will last longer. Here are some tips to seal your basswood panel for maximum protection. Make sure you use the right sealer for your panel.
Sealing coats
Follow all instructions when using a sealer for wood carvings. Use a paintbrush to apply the sealer in a thin layer over the entire carving. Let the sealer dry completely in an open area before applying the next coat. After the sealer has dried completely, lightly sand the carving to remove any excess coating. This step is not necessary if you have a very delicate carving.
Using gesso
Make sure you prepare your wooden carvings by applying gesso on both the front- and back surfaces before you paint. This material absorbs more paint than student-grade gesso. It is often thinner than the latter. For greater pigmentation, you can mix it with acrylic painting. But it's not necessary. The amount of paint you intend to use determines the thickness of the gesso.
Selecting the right wood
Choosing the right wood for painting wood carvings is important, as paint can affect the physical dimensions of the piece. Choose a lighter, neutral wood to allow you to paint over and highlight dark tones. You can always paint the wood with a darker shade if it is too dark. No matter if you want to paint the whole wood, or only parts, you should choose a neutral color for the painting.
Pre-treatments
Many wood carvings are painted and colored. These works of wood art require pre-treatment in order to prevent oils, water, and paints leaking through. This is especially true when it comes to softwoods like bassewood, which is very absorbent. Wood carvings can also be painted using a special wood paint. But, to avoid issues, there are some things you need to know. This article will describe how to pretreat wood.
FAQ
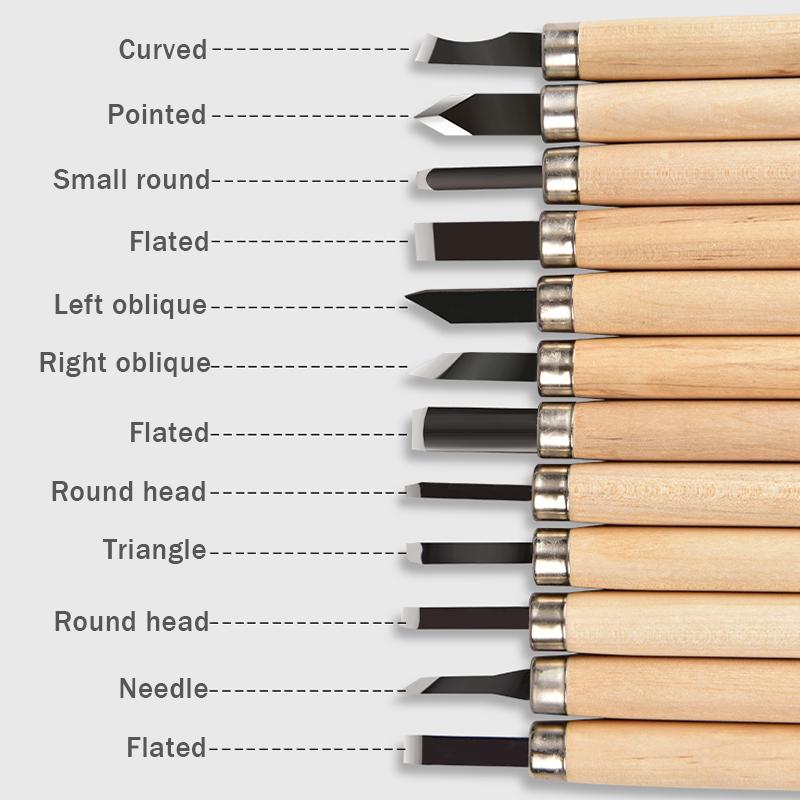
What tools work best for me?
It helps to reflect on your needs and preferences before you shop for tools. Do you prefer metal or plastic handles What size screws and nails do you use most often? Are you more comfortable using power tools than hand tools?
How do I know what type of wood I'm dealing with?
Always verify the label on wood purchases. It should have information about the wood species as well its moisture content and whether any preservatives were used.
What wood items do well?
Wood that has been harvested sustainably is the best-selling type of wood.
Oak, cherry and mahogany are the most sought-after wood types for furniture.
These woods are extremely strong but also have beautiful colors and grain patterns. If they are well cared for, they can last many years.
To prevent moisture damage, wood furniture should always first be painted. All surfaces should be painted, including doors, drawers, and handles.
Paint that is water-resistant will ensure furniture lasts for a long time.
You should use a high-quality oil-based primer followed by two coats of top coat. Depending on the amount of wear, you may need several coats.
You should avoid using aerosol paints or spray cans. These products are contaminated with solvents, which evaporate rapidly and can leave behind toxic fumes.
How long does it take to finish a piece of furniture?
It all depends on what type of wood you use, how complex your design is, and how much finishing you use. Hardwoods are more difficult to maintain than softwoods. Hardwoods tend to be more expensive that softwoods. However, they are stronger and more resistant to moisture. The average time it takes to finish furniture is one week to three weeks.
Can I make my living doing this job?
Yes! Many woodworkers do. According to U.S. Bureau of Labor Statistics (BLS), woodworkers earned a median annual salary of $34,000 in May 2012. This is much higher than the national median of $31,000 per annum.
Statistics
- Most woodworkers agree that lumber moisture needs to be under 10% for building furniture. (woodandshop.com)
- If your lumber isn't as dry as you would like when you purchase it (over 22% in Glen Huey's opinion…probably over 10-15% in my opinion), then it's a good idea to let it acclimate to your workshop for a couple of weeks. (woodandshop.com)
- The best-paid 10 percent make $76,000, while the lowest-paid 10 percent make $34,000. (zippia.com)
- Overall employment of woodworkers is projected to grow 8 percent from 2020 to 2030, about as fast as the average for all occupations. (bls.gov)
External Links
How To
How to make wood joint
This tutorial will show you how to join two pieces of wood together. We will use the pocket hole joint, which is drilling holes in the wood to join them. This method is great if your wood's straight and smooth. Try dowel joinery instead if your wood doesn't look straight. These are the steps
-
Drill Pocket Hole Joints. Measure and mark the location where you would like to place the pocket hole joint. Use a jigsaw or handheld drilling machine to drill 3/8 inch deep holes at the ends of each wood piece.
-
Sand Smooth. Sanding the wood's edges will help ensure that the joint won't split later.
-
Glue both sides together. Apply glue to both the ends of the wood. Let it sit for about 5 minutes before clamping the pieces together.
-
Clamp the Pieces Together. Once the glue has dried, clamp the pieces together so they are flush.
-
Trim Joinery. Trim any excess wood surrounding the joint once the glue has dried completely.
Allow enough space between pieces so you can turn them inside out.