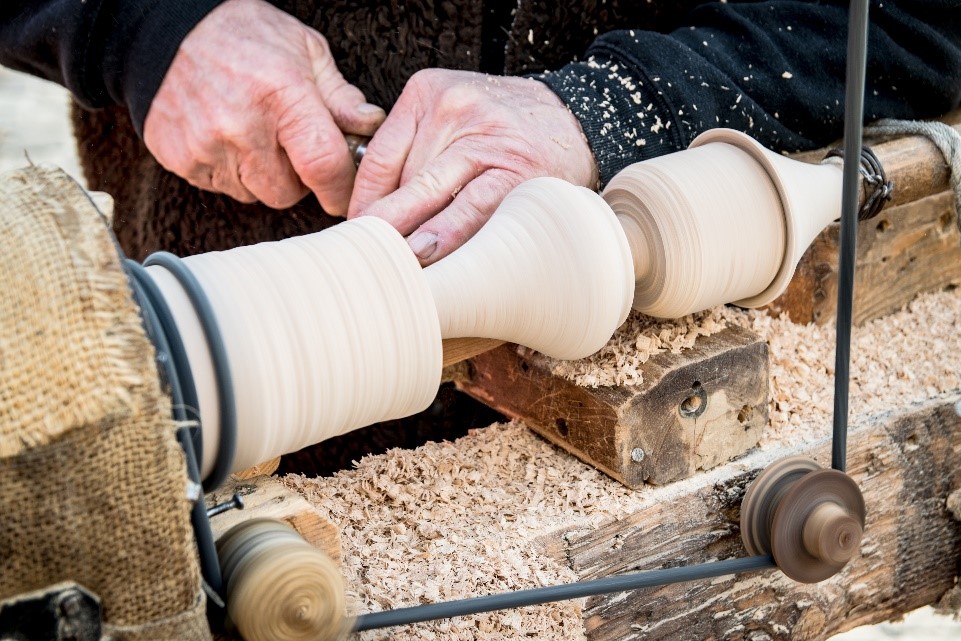
To cut undercuts with the spindle, use the woodturning tool ring. When using this tool, you must be present to the spindle and move slowly away from it. You should not pull the cutting tip too fast as this could cause the ring to crack. You can sand the inner bead before the spindle splits. It is also recommended to use the captive ring tool to make undercuts on the spindle before separating it from the spindle.
Termite tool
The Termite Tool for Woodturning is a ring-shaped cutter that hollows end grains quickly. The Termite tool is named after its smooth, smooth cut that requires very little sanding. The Termite Tool is very useful for hollowing boxes, goblets, and other hollow objects. This tool can also be used to create bowls or vessels.
The Termite tools' ring-shaped cutting edges create shear cuts in any material. Termites are ideal for hollowing small containers without drilling a hole. Unlike a drill, the termite picks up the cut right off the center. It can produce flat or concave bottoms. To use the Termite tool, you must present the cutting edge to the wood first. If you do not, the termite tools will be caught on the wood drive.
Hercules
The Hercules woodenturning ring-tool, also known as the Hercules, is a versatile tool that can help you create intricate bowls and penforms. Its 3/8" round #3 Hunter Carbide Cutter and 5/8" square shank are ideal for rough and finish turning. The lathe's tool rest and ways absorb the impact of the wood turning tool, while still giving you a soft touch to make final cuts.
Hercules also offers a complete woodturning ring-tool kit, which includes a power drill, a rotary hammer, and a standard charger. This tool kit retails for $130, but it is also available online at $25. If you shop outside of the holiday season, the bundle price is great. The quality of Hercules tools is higher than that of some competitors', so you'll save money in the long run.
Osprey
The Osprey woodturning ring-tool is a wonderful tool that will give you a clean finish on your bowls. This tool is made from #2 Hunter Carbide Butter, and has a 1/2" shank. It is excellent for making fine finish cuts, but you can also use it for basic turning tasks. You'll love this gouge if you're looking for a new one.
Osprey woodturning rings-tools come with a drill. This versatile piece can be used with a drill press or simple corded drill. For precise drilling, the drill-bit can be crucial. But, beginners can do fine with a Forstner little. A larger blank can be purchased to drill the first few rings if you are a beginner.
Robert Larson
There are many options if you're thinking of buying a woodturning rings tool. Some prefer to use a hand-made tool and others prefer a model that is digital. Robert Larson Co Gouge Slip can be a great tool for beginners. It's inexpensive and comes equipped with hardened brass pins and plates. The set includes one pin for standard marking and two pins for marking joints. These are two excellent choices.
Benjamin's Best
You've likely seen ads for Benjamin's Best's woodturning ring tool. What is the difference between these tools and other competitors? They are different. Benjamin's Best woodturning tools come with eight pieces. Each piece is intended for a different purpose. The ring tool is used to create a smooth and even surface for turning. It is protected by a black coating to ensure durability.

Unlike other woodturning tools, the ring tool comes with a captive ring. These rings may be decorative or functional depending on their design. These rings can be used as puzzle pieces by non-turners. Many spindle turns use captive rings. All of these pieces can be made with the ring tool.
CROWN
CROWN Woodturning Ring Tool is a versatile tool that hollows thin-walled and wet-wood objects. It has a dual-bevel "High Speed Steel" rings that provide exceptional results when hollowing into the ends grain. It is capable of handling both flat and curved forms with ease. It is an excellent choice because of its price/performance ratio. The handle is stained beech and can be used for many tasks.
Made in Sheffield, England, the CROWN woodturning ring tool is made of the highest quality, cryogenic steel. You can cut both the right and left sides of the ring with the double bevel. Its precision-ground edge stays sharp even after years of professional use, due to its carefully polished and ground inside. This tool comes with a lifetime guarantee. Crown's tools are long-lasting and durable, making them a must-have tool for woodturners.
FAQ
Where can I purchase woodworking supplies
There are plenty of places where you can find everything you need to start out. You could shop at your local hardware store or go online to Amazon.com.
You might also consider flea markets and garage sale for any old furniture or other materials you could reuse.
What kind and type of wood should i use?
Woodworking is a popular job that involves oak, pine and maple. Each type of wood has its own unique characteristics that can affect the final product's appearance. Oak tends to be harder and darker than other woods. Birch is soft and light, and mahogany is denseer and heavier. There are two options: solid wood and veneers. Veneers are thin sheets of wood that are glued together to form a single layer.
What would be your first step in woodworking?
You can start with softwoods like pine or poplar. After you are comfortable with the softwoods, move to hardwood.
Statistics
- Most woodworkers agree that lumber moisture needs to be under 10% for building furniture. (woodandshop.com)
- The U.S. Bureau of Labor Statistics (BLS) estimates that the number of jobs for woodworkers will decline by 4% between 2019 and 2029. (indeed.com)
- If your lumber isn't as dry as you would like when you purchase it (over 22% in Glen Huey's opinion…probably over 10-15% in my opinion), then it's a good idea to let it acclimate to your workshop for a couple of weeks. (woodandshop.com)
- Overall employment of woodworkers is projected to grow 8 percent from 2020 to 2030, about as fast as the average for all occupations. (bls.gov)
External Links
How To
How to stain hardwood
The process of staining wood involves the application of chemicals to the wood's surface, which causes it to change its color. This chemical reaction causes wood to turn from whiteish to brownish. The most common type of wood used for staining is oak, although many other types of wood can be stained.
There are several ways to apply stains to wood surfaces. One method involves mixing the stain and a solvent and then spraying it on the wood. Others use a solution made up of water and dye, which is then applied directly onto the wood. The stain can be mixed with paints and varnishes to become part of the final coating.
Preparing your wood for staining is the first thing to do. The wood must be thoroughly cleaned to remove all grease and dirt. Sanding smoothens scratches and rough spots. The next step is to determine the type of stain you would like to use. There are two main types of stain: non-penetrating and penetrating. Penetrating and non-penetrating wood stains penetrate deeper than other types, making them perfect for dark colors like mahogany. The best non-penetrating colors are those that work with light colors like maple.
You will need to decide on the type of stain you want to use, and then prepare your tools. Because you can spread the stain evenly with a paintbrush, it is ideal for applying them. After you're done painting, make sure to have some rags handy to remove any excess stain. If you plan to mix the stain yourself, make sure you have enough containers available to hold the different components of the mixture.
After you have prepared the materials, you can clean the area where you want to stain the wood. You can remove grime and dirt with warm water and soap. Use a dampened sponge and warm water to clean the entire piece. You should remove any debris, especially if your plan is to stain darker wood.
Next, spray the stain. Apply the stain by brushing or spraying it onto one side of the furniture. You should work slowly and carefully. Continue moving along the grain until you reach your opposite end. Make sure that the stain does not drip off the edge of the wood. Before moving on to the next steps, allow the stain drying completely.
Protect the painted surface with a coat polyurethane paint sealant. Three coats are recommended for polyurethane. Allow the third coat, which should dry overnight, to dry before sanding.