You can start by learning the basics of whittling if you're just starting out. Make sure to have some tools and a knife. In this article, you'll learn about tools, techniques, and wood types. Once you have the basics, you can begin your own whittling projects. There are many different types of whittler jobs to choose.
Wood
There are thousands of different types of wood. However, these four woods will be most effective for whittling. These woods will help you learn the basics of whittling if you're just beginning. There are many different ways you can whittle wood to get different shapes. Here are some simple methods for whittling wooden objects.
The pull stroke: While carving wood, you need to keep the blade parallel to the grain of the wood. This will ensure that the wood is not ripped. You can tell which direction the grain is by looking for dark streaks throughout the wood. When whittling, the direction these streaks run will determine the direction of the blade. The push stroke cuts through wood faster than the pull stroke.
Knife
If you are just starting out in woodworking, it can be fun to practice your skills by using a knife to cut. Although you may not be an expert at this task, you will have greater control over your knife and can make more precise cuts. To practice the pull stroke, cut small strips of soap with your knife. Practice makes perfect. It is easier to tackle beginner projects, and they become more challenging as you go along.
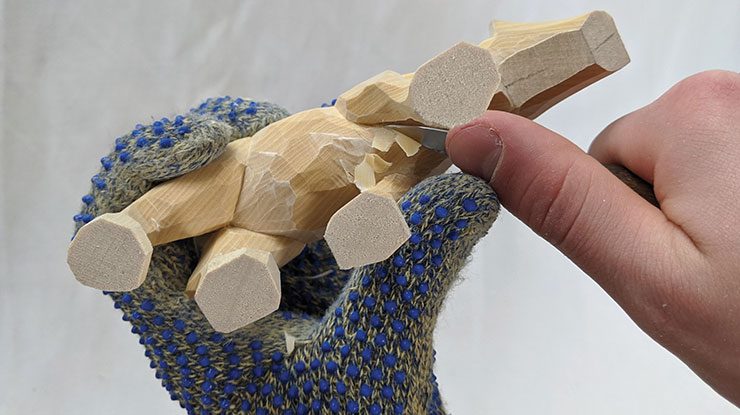
Before starting whittling, you'll need a knife. A pocket knife is perfect as it is sharp enough that you can make razor-sharp shavings using a sharp blade. Avoid knives with wide, long blades, as these can cause choking and shouldn't be used for this task. Choose a knife that has a narrow bevel to make it easier to sharpen. If you need to, you may also want to use a frame saw.
Techniques
You can improve your whittling skills by learning these techniques. The pull stroke is the most common. It involves bracing the right thumb against the wood and pinching the right fingers. Next, draw the knife to your right thumb while keeping it straight. This stroke is quick and precise and gives you great control over the knife. This technique is ideal for cutting intricate pieces.
There are two types of whittling publications. The Old Time Whittling is the first, and it is a great reference book for beginners. The Little Book of Whittling contains many useful whitling suggestions. The Whittling Handbook contains many whittling-related projects. The Art of Whittling includes some more advanced projects. This book has simple puzzles as well as patterns such as ball-and-cage.
Tools
First, you need to choose the best wood for your project. While it is possible to use existing wood, it is much better to gather greenwood. Greenwood is more difficult to carve than dry wood. Deadfall branches can be collected at any time. Even though small trees can still be picked up at any time of the day, it is best to do so in winter. If you're working on private property, ask permission before collecting wood.
There are many great sets for beginners. One such set is the Delicacy carving set, which contains 12 tools, a wooden spoon blank, and a knife sharpener. This set also includes protective gloves, a carry bag and a pouch. Because you'll be using these tools for a long time, it is worthwhile to invest in a set. This set can also be used to start.
Projets for beginners
You might start out with a simple project like a walking stick if you're new to wood whitling. Then you can start to tackle more difficult projects such as carving faces onto walking sticks. Beginner whittlers may find comfort in a bird like the Comfort Birdie. A swan is another beginner-friendly whittling project. These are great gifts and easy to make for children.
Another project that is considered a beginner project is a carved ball in a cage. You can create intricate designs and use feathers to match your theme. Tiki idols or woodland spirits can be made. Although there are many possibilities, it is a good idea that you have a template ready to go before you start. You'll be able to identify which tools are best and what parts you don't need.
FAQ
How do I get started with woodworking?
You can learn the most effective way to build furniture by actually building it. While you will need tools, mistakes are inevitable, but you will learn the ropes if you persevere.
Start by choosing a project you'd like to complete. It could be something as simple as a box or as elaborate as a full-scale entertainment center. Once you have chosen a project, locate a local woodworker who is skilled in this kind of work. Ask them for their advice about the tools and where they can be found. Maybe you can ask the person if they know of anyone who does this sort of work.
What kind of wood should you use?
There are many wood types that are used in woodworking, including oak, maple and birch. Each wood type has its own characteristics which affect the final product's appearance and feel. Oak tends to be harder and darker than other woods. Birch is lightweight and soft while mahogany is heavier and denser. You can also pick between veneers and solid wood. Veneers consist of thin sheets made from wood and glued together to form a single layer.
How much should a skilled woodworker earn per hour?
Hourly rates for professional woodworkers vary depending on many factors such as skill, experience, availability, geographical location, and other variables.
A skilled woodworker can expect an hourly rate of $20-50.
A woodworker with less experience may be able to charge $10 an hour.
What amount of money do I need to get started with my business?
Because every project is unique, there aren't exact numbers. These factors will help you get an estimate of how much money is needed.
-
Material cost
-
Tools and equipment
-
Time spent on the Project
-
Your hourly rate
-
What is your expectation for profit?
-
Hire help
Start small, if possible. You can make simple boxes or picture frames if you're just getting started. You will gain more experience and be able to tackle larger projects.
Where can I find my woodworking tools?
There are many places that you can find all the information you need. You can visit your local hardware stores, or you can look online at sites like Amazon.com.
You can also check garage sales and flea markets for old furniture and other materials you can reuse.
How do I learn basic woodworking skills?
Building a bench is a great way to get started in furniture building. This project can easily be done using whatever wood you have at your house. You don't need to know which type of wood you should use. Instead, get some pine boards at Lowes or Home Depot. You'll need to sand the bench after it's built. Then, finish it with varnish or a stain.
Statistics
- Overall employment of woodworkers is projected to grow 8 percent from 2020 to 2030, about as fast as the average for all occupations. (bls.gov)
- If your lumber isn't as dry as you would like when you purchase it (over 22% in Glen Huey's opinion…probably over 10-15% in my opinion), then it's a good idea to let it acclimate to your workshop for a couple of weeks. (woodandshop.com)
- Woodworkers on the lower end of that spectrum, the bottom 10% to be exact, make roughly $24,000 a year, while the top 10% makes $108,000. (zippia.com)
- In 2014, there were just over 237,000 jobs for all woodworkers, with other wood product manufacturing employing 23 percent; wood kitchen cabinets and countertop manufacturing employing 21 percent. (theartcareerproject.com)
External Links
How To
How to make wooden joints
This tutorial will teach you how to join two pieces wood together. We will be using the "pocket-hole joint", which involves drilling holes in wood and then gluing them together. If your wood has a straight grain, smooth surface, you can use this method. You may want to consider other methods, such as dowel joining. Here are the steps
-
Drill Pocket Hole Joints. To start, measure and mark where you want to put the pocket hole joint. With a handheld drill machine or jig saw, drill 3/4-inch deep holes in the ends of each piece.
-
Sand Smooth. Sanding the wood's edges will help ensure that the joint won't split later.
-
Glue together. Apply glue on both sides of the wooden plank. Let it sit for about 5 minutes before clamping the pieces together.
-
Connect the pieces. Once the glue has dried, clamp the pieces together so they are flush.
-
Trim Joinery. Trim any excess wood surrounding the joint once the glue has dried completely.
You should leave enough space between the pieces to allow you to turn them inside-out.